If you ever want to add your signature to a photo here is a quick way to create your signature brush. This allows you to add your signature with just one click of the brush tool.
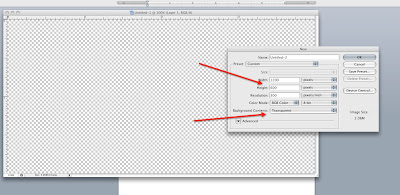
Create a new document in PhotoShop. File>New, make the new file approximately 1200 x 600 pixels, Choose Transparent for the background.
With the Text tool, type your name (or enter your text) in Black. Choose the font(s) that you like and format how you wish.

Select your text with the text tool. Then, choose your brush tool and then go to the Edit menu and choose Define Brush Preset. Name your new brush and click OK.
Now open an image that you wish to add your signature to. Then Choose the Brush Tool and open your brush palette (in the upper left hand corner of your screen). Your new brush will be added to the end of your existing brushes.
When you hover over your image with your new brush tool selected you will see your signature as your brush.
You can increase or decrease the size of your brush in two ways. Either choose the pixel size from the slider at the top of your brush palette. Or you can press the left or right bracket keys on your keyboard. (to the right of the letter P on your keyboard).
If you want to change the color of your text just click on the Foreground Color Box to bring up the Color Picker dialog box. Choose your color. Then Click OK. Now go back to your image with your signature brush and place your signature where you’d like.
Or, you can click on the Foreground Color Box With your Eyedropper Tool and choose a color from within the image that would work well for your signature.
You can always go back and change any of these settings. And you can move your brush if you don’t like how it looks after you’ve placed it. (love the UNDO command!). Just remember, you always have to have your brush tool selected for any of these steps to work! Get Creative and
Have Fun!

No comments:
Post a Comment