Apologies for not posting lately. I have been really tied up with work this summer, especially the course that I'm teaching for Learn To Take Photos.com. The course is so much fun but is taking more time than initially anticipated.
I'll be back soon though, with more Tips for Photographers! Thanks for your patience!
Cheers,
Bev
Monday, June 21, 2010
Sunday, June 6, 2010
Adding Contrast - FAST!
Last week I had the pleasure of joining a talented group of photographers on an Arizona Highways photo workshop in Monument Valley, Navajo Nation, Arizona. Most of the images that I took were shot at sunrise or sunset (during that "magic" hour when the light is brilliant and warm). When photographing landscapes one can come up against hazy morning skies. You may want to increase the contrast when you get your images into Photoshop.
Here is a really quick and easy way to get rid of the haze (and a good starting point for your post production work in Photoshop). Click on any image to enlarge.
Here is my original image:


And here's what you do:
1. Open your original document.
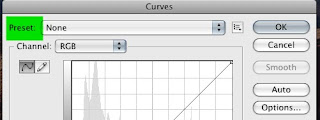
2. Add a Curves Adjustment Layer to your Background Layer

4. From here you can add further Curves Adjustment Layers to adjust the levels of darks and lights selectively in your image on the mask provided with the adjustment layer.
That's it! Quick and easy!
Here is a really quick and easy way to get rid of the haze (and a good starting point for your post production work in Photoshop). Click on any image to enlarge.
Here is my original image:

And here is the adjusted image:

And here's what you do:
1. Open your original document.
2. Add a Curves Adjustment Layer to your Background Layer

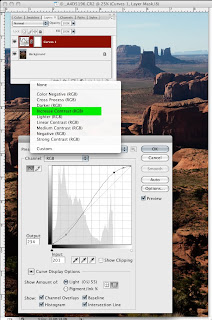
3. From the Curves Adjustment Layer window choose Increase Contrast from the Preset drop down list at the top of the Curves window.


4. From here you can add further Curves Adjustment Layers to adjust the levels of darks and lights selectively in your image on the mask provided with the adjustment layer.
That's it! Quick and easy!
Subscribe to:
Posts (Atom)