- Open a larger than you’ll ever need new document in PhotoShop. Make sure the background is Transparent.
- Next choose your Text Tool. You can choose a font, color and size for your symbol either before or after you create your © symbol in your PS document.
- To create a © symbol using a PC you hold down the Alt key and type 0169 on your keypad. (The keypad is to the far right side of your keyboard). Then release the Alt key and you’ll see your symbol - ©. On a Mac type Option-G to get your © symbol.
- Now that you have your © symbol in a PS document you should save it.
- You can go back to your saved symbol document anytime to change the font, color, size, opacity or change the attributes of the symbol.
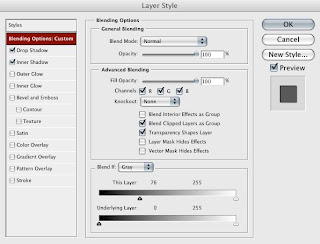
- To change the attribute and/or opacity of the symbol you would first use the Text Tool to select your symbol. Now you can change the color, font or size. You can also change the opacity or add a drop shadow in your Layers Style dialog box. In the Layers window, double click on the text next to the layer thumbnail of your symbol to unlock it. You can open your Layers Style dialog box by double clicking the text bar to the right of your symbol thumbnail. Once you are in the Layers Style dialog box try playing with the Blending Options (drop shadow, inner shadow, etc.) and the Opacity (under General Blending). Also try adjusting the Blend If: Gray sliders at the bottom of the Layer Style dialog box to see how this changes the symbol.
- Once you are happy with how the symbol looks you can simply drag the symbol on to the opened document in which you want the symbol placed.
- After the symbol is placed into over your document you can change the size of the symbol if you wish. Be sure to choose the symbol thumbnail in your .psd Layers Palette. Next go to Free Transform under the Edit Menu. Hold down your shift key to constrain the proportions and drag a corner to enlarge or reduce the size of the symbol.
- A more transparent symbol looks nice when placed directly over an image so that it doesn’t overpower the image itself, yet your copyright symbol is still obvious.

No comments:
Post a Comment