Apologies for not posting lately. I have been really tied up with work this summer, especially the course that I'm teaching for Learn To Take Photos.com. The course is so much fun but is taking more time than initially anticipated.
I'll be back soon though, with more Tips for Photographers! Thanks for your patience!
Cheers,
Bev
Monday, June 21, 2010
Sunday, June 6, 2010
Adding Contrast - FAST!
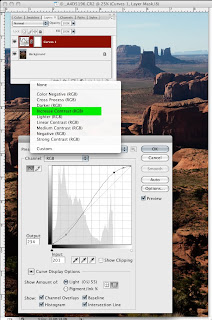
Last week I had the pleasure of joining a talented group of photographers on an Arizona Highways photo workshop in Monument Valley, Navajo Nation, Arizona. Most of the images that I took were shot at sunrise or sunset (during that "magic" hour when the light is brilliant and warm). When photographing landscapes one can come up against hazy morning skies. You may want to increase the contrast when you get your images into Photoshop.
Here is a really quick and easy way to get rid of the haze (and a good starting point for your post production work in Photoshop). Click on any image to enlarge.
Here is my original image:


And here's what you do:
1. Open your original document.
2. Add a Curves Adjustment Layer to your Background Layer

4. From here you can add further Curves Adjustment Layers to adjust the levels of darks and lights selectively in your image on the mask provided with the adjustment layer.
That's it! Quick and easy!
Here is a really quick and easy way to get rid of the haze (and a good starting point for your post production work in Photoshop). Click on any image to enlarge.
Here is my original image:

And here is the adjusted image:

And here's what you do:
1. Open your original document.
2. Add a Curves Adjustment Layer to your Background Layer

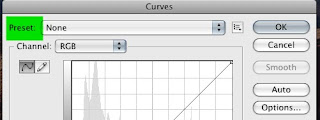
3. From the Curves Adjustment Layer window choose Increase Contrast from the Preset drop down list at the top of the Curves window.


4. From here you can add further Curves Adjustment Layers to adjust the levels of darks and lights selectively in your image on the mask provided with the adjustment layer.
That's it! Quick and easy!
Wednesday, May 19, 2010
Edit your Images on Layers
Whenever you want to make an adjustment to your image in Photoshop it is highly recommended that you do any work on a new Layer, and not on your Background Layer. All that you need to do is create a duplicate layer of your background (Ctrl/Cmd J). This is called "non-destructive" editing. Another good reason for working on a duplicate layer is that if you ever want to go back and make further changes to your adjusted layer you can do so as many times as you like, as long as you save your file in the Photoshop (.psd) format. This way, your layers will be saved along with your original background layer.


I am proud to announce that I will be teaching a new course at Learn to Take Photos, the online photography school, starting June 2: The course is called The Creative Power of Photoshop Layers. There's still time to sign up if you want to learn more about this MOST useful feature in Photoshop.
Wednesday, May 12, 2010
Create an Infrared Effect


- Although the original use of infrared was intended for film, we can reproduce a similar effect with just a few easy steps in Photoshop. Here's how: (click on any image to enlarge)
- Open your image and make a copy of your Background Layer. (Cmd/Ctl J)
- Next, create a Channel Mixer Adjustment Layer (from the Adjustment Layer icon at the bottom of your layer's palette)

- In the Channel Mixer dialog box make sure the Monochrome box is checked so that your image converts from color to Black and White. Next move your green slider all the over to the right (+100) and your blue slider all the way to the left (-100). Then move your red slider to +100. Now you can fine tune your sliders until you get the black and white toning that you like in your image. Just be sure that the Total for the sliders comes out to +100%.

- Now we want to add a Filter to our Infrared layer but we can't add a filter to a the adjustments layers below so we have to create a Merged Copy Layer to apply the filter to. So with the top layer active hold down Shift - Option - Command (Mac) or Shift - Alt - Control (PC) all at the same time, and then type the letter N and then the letter E. Now you should have a fourth layer, a merged copy layer, that we can apply the filter to.

- So with the Merged Copy Layer selected go to the Filter Menu and choose Distort>Diffuse Glow.

- You'll get a new screen Diffuse Glow screen. On the slider bars choose settings similar to this:

- You can play around with the settings. They may be different depending on your image. But that's it! Have fun!


Monday, May 3, 2010
Paint a Frame Around your Photo

How to Paint a Frame Around your Photo. Click on any image to enlarge.
This technique offers many possibilities for creating a fun and different look to your photo. Here are the steps I used to create this image:
- Open your image and duplicate the Background (Cmd/Ctrl J). Make sure your Layers Palette is open (go to Window>Layers).
- Go to Image>Canvas Size. Add one inch of canvas to the width and the height.
- Click on the top layer (the duplicate). Next we're going to tilt the image by going to Free Transform under the Edit Menu or hit Cmd/Ctrl T on your keyboard to bring up the Free Transform command. Grab ahold of one of the "handles" on the corners and slightly tilt your image to the left or right.

- When you are satisfied with the tilt hit the check mark on your Toolbar.

- Set your Background and Foreground colors to their default. Press D on your keyboard.

- Select the Background Layer. Press Option-Delete on a Mac or Alt-Backspace on a PC to fill the Background Layer with Black.
- Select the brush tool on your tool bar.

- Pick a brush style from your Brush Picker. Now here's where you can get really creative. For my example I chose a "stipple" brush but you can play with all of the brush styles and sizes for a different effect if you wish.

- What we're going to do is paint a line around our image to create a brush stroke frame. I selected a light gray color for my brush but you can have some fun with other colors if you wish. You can change your brush color by clicking on your foreground color to bring up the color picker.
-
 Or you can choose the eyedropper on the tool bar and then pick a complimentary color in your image for your frame.
 - Now we're just going to paint around the image with the paint brush. Make sure your image layer is selected (not your black background layer). With the brush style, size and color now chosen click once in any corner of your image. Press and hold the Shift key down, and click on the next corner. Repeat until you have completed your painting around all four sides of your image.

- That's it! Have fun!


Monday, April 26, 2010
Digital Gallery Matt

Even though we post so much of our work these days on the internet and don't actually print and matt every image, it's nice to be able to present a photograph on the internet with the look of a fine art gallery print.
Here's how to create a matt around your image in a few easy steps: (Click on any image to enlarge)
Open your image in Photoshop. Be sure that your Layer's Palette is open. Go to Window>Layers to turn it on if it isn't already open. Duplicate your background layer. Command-J (Mac) Control-J (PC).

Next we are going to increase the canvas size to create the matt board look around the image. From the Image Menu choose Canvas Size. Make sure that the "relative" box is checked to turn it on. Add one inch to the width and the height.

Choose Image>Canvas size again. This time add .75 to the height but be sure that the top-center square is selected. This will add the space to the bottom of the image only. Many times you will see matt boards cut with a little more "weight" on the bottom. This also allows for room to add text if you'd like.

Now we're going to add an outline around the "matt opening". Command click on a Mac, Control click on a PC, on the top layer thumbnail. Go to the Select menu and choose Transform Selection. Now we're going to enlarge the selection to make a frame around the opening. To constrain the proportions, resize the selection from the center, be sure that you press and hold down the Option Key on a Mac, Alt Key on a PC. Drag one of the corner handles out to enlarge the selection. Press Return or Enter (PC) when you have the selection the size you want it.


In order to add a stroke line for this selection we need to Create a New Layer (bottom of the Layer's Palette). Go to the Edit Menu and choose Stroke. Make the width about 2 pixels wide and choose a color (or leave it black). Click OK and then deselect by pressing Command-D on a Mac, Control-D on a PC.


You can add a drop shadow to your stroke layer by adding a Layer Style (bottom of the Layer's Palatte). Choose Drop Shadow, click once on the drop shadow name to go to the drop shadow dialog box. Change any settings to your liking and hit OK to close the dialog box.

If you want to add text to the bottom area of your new matt simply choose the Type tool, center align your text and begin typing. Open your Type dialog box to make changes to fonts, sizes, colors, tracking, etc.

And of course, because you used layers in all of these steps, you can always go back and make changes if you wish. Just be sure to save your document as a PSD file to keep the layers in tact.
Wednesday, April 21, 2010
Rule of Thirds
According to Wikipedia: The rule of thirds is applied by aligning a subject with the guide lines and their intersection points, placing the horizon on the top or bottom line, or allowing linear features in the image to flow from section to section. The main reason for observing the rule of thirds is to discourage placement of the subject at the center, or prevent a horizon from appearing to divide the picture in half.
 I have found that applying this Rule of Thirds, either consciously or subconsciously to my images, really does improve the composition. Again I quote from Wikipedia (because they really do say it best): The rule states that an image should be imagined as divided into nine equal parts by two equally-spaced horizontal lines and two equally-spaced vertical lines, and that important compositional elements should be placed along these lines or their intersections. Proponents of the technique claim that aligning a subject with these points creates more tension, energy and interest in the composition than simply centering the subject would.
For this Tips Lesson I would like show you how to create Rule of Thirds guides in Photoshop that you can turn on and off so that you can check every one of your images to see if it complies with this compositional "rule". I think that if you pay more attention to this you will find that your image also will have more energy and interest. I know mine do!
Here we go: (Click on any image to enlarge)
- Open an image in Photoshop.
- Under the Photoshop Menu choose Preferences>Guides, Grids and Slices.

- In the Preferences Dialog Box, in the GRID section, set your Gridline to 33.3 percent. I changed the color of my gridlines to green. I just felt that green would show up better. But you can change this color to whatever you like or leave it at the default. Make sure that your Subdivisions section is set to 1. Click OK.

- Now when you go back to your image in PS go to the View Menu, Choose Show>Grid. This is how you can turn your Rule of Thirds Gridlines on and off.

- Practice this with a few different images to see how it applies to each and then you decide which look compositionally "correct".


Friday, April 16, 2010
Active Space
This has been a busy week. Right now I'm in Mexico enjoying the Sea of Cortez with my family ...which includes our two very rambunctious dogs.
Over the years I've found that one of the most valuable ways to learn useful photography tips is to sign up for one of the many well-run online courses available these days. Here are my favorite places to go for online courses: Learn to Take Photos (learntotakephotos.com), Equine Photographers Network (equinephotographers.org), Perfect Picture School of Photography (ppsop.com) and Better Photo (betterphoto.com).
I finished a wonderful course on Composition in photography a couple of weeks ago led by Shelley Paulson, a fantastic photographer from Minnesota. This course, offered through Equine Photographers Network, was all about composition and how to make sure your photographs have lots of punch by ensuring your compositions are as good as they can be.
One of my favorite lessons from Shelley was her lesson on Active Space. Leaving active space in front of your moving subject means that you always want to leave enough room for your subject to move into. Alternately, the space behind your subject is often referred to as dead space. The reason that this compositional technique is important is that when someone views your image and sees that your subject is moving in one direction – their eye naturally wants to move in that direction also. If you crowd your subject too much your eye has nowhere to go and your composition becomes static. I took this photo of our dog on the beach yesterday to illustrate a good example of the concept of active space.

Sunday, April 4, 2010
The Orton Effect or Creating a Slide Sandwich


- Select an image and open it up in Photoshop. Make a duplicate of the image (Image>Duplicate) so that you are not working on your original. Close the original image.

- Lighten your image by changing the Blend Mode. Go to Image>Apply Image and change your Blending Mode to Screen. Make sure the Opacity is set to 100%. Your image will now appear to be Overexposed.

- Now duplicate this image. Go to Image>Duplicate.
- Blur the duplicated image. Go to Filter>Blur>Gaussian Blur. Set your Radius to somewhere between 10 and 80 pixels. The smaller file size of your image, the less blur you will choose (small file=small radius; larger file=large radius). You can experiment with different radius choices.


- Select your Move Tool from the Toolbar. Hold down the Shift Key and drag your blurred image onto the sharp one.

- Make sure your Layers Palette is visible. Go to Windows>Layer to bring it up if it isn't already. Change your Blend Mode from Normal to Multiply.

- Without any further adjustments you have a dreamy fine art picture!

- Flatten your image. (Layer>Flatten) And then Save it!


Monday, March 29, 2010
Make your colors POP!
There are times when your photo needs a little boost to brighten up flat lighting and colors. Today we'll go over a quick way to get those images to POP!
Click on any image to enlarge it.
- Here is my original image.

- And here is the same image after using a Curves Adjustment Layer to POP the colors!

- Open your image in Photoshop. Change the color mode to Lab Color (Image Menu>Mode>Lab Color). You will see why this is important when we open our Curves dialog box. Instead of Red, Green, and Blue channels (as in RGB mode) you will have Lightness, "a" and "b" channels to work with.

- Create a New Adjustment Layer by clicking on the Adjustment Layer Icon at the bottom of the Layers Palette.


- Press and hold down the Option Key (Mac) or the Alt Key (PC) and click once on the Curves grid to make the grid smaller.
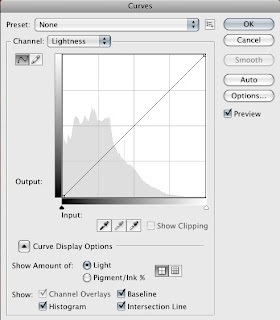
- From the Channel menu choose the "a" channel. Click and drag the top point at the curve one box to the left. Then click and drag the bottom point at the curve one box to the right.


- Now choose the "b" channel and do the same thing here.
- Click OK to close your Curves dialog box and see the results from your adjustments. You can always go back to your Curves dialog box to increase or decrease your adjustments by clicking on the Curves Adjustment Layer in your Layers Palette.


Subscribe to:
Posts (Atom)