As a fine-art photographer for the past nineteen years I've come up against my fair share of
technological challenges in photography. The shift from film to digital was monumental!
In this blog I'd like to share with you what I've found to be some of the most useful PhotoShop
techniques when working with my digital images. I hope that they will make your life a bit easier
as you work with your images. Have fun!

Welcome to my "Photoshop Tips for Photographers" Blog

Please Note: These tips have been prepared using Photoshop CS3.

Monday, March 29, 2010

Make your colors POP!

There are times when your photo needs a little boost to brighten up flat lighting and colors. Today we'll go over a quick way to get those images to POP!

Click on any image to enlarge it.
  1. Here is my original image. 

  2. And here is the same image after using a Curves Adjustment Layer to POP the colors!
  3. Open your image in Photoshop. Change the color mode to Lab Color (Image Menu>Mode>Lab Color). You will see why this is important when we open our Curves dialog box. Instead of Red, Green, and Blue channels (as in RGB mode) you will have Lightness, "a" and "b" channels to work with.
  4. Create a New Adjustment Layer by clicking on the Adjustment Layer Icon at the bottom of the Layers Palette. 
  5.  
  6. Press and hold down the Option Key (Mac) or the Alt Key (PC) and click once on the Curves grid to make the grid smaller.
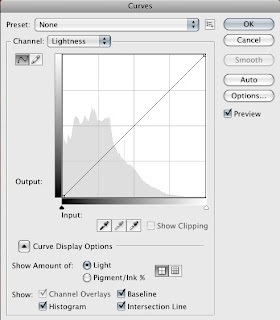
  7. From the Channel menu choose the "a" channel. Click and drag the top point at the curve one box to the left. Then click and drag the bottom point at the curve one box to the right.
  8. Now choose the "b" channel and do the same thing here. 
  9. Click OK to close your Curves dialog box and see the results from your adjustments. You can always go back to your Curves dialog box to increase or decrease your adjustments by clicking on the Curves Adjustment Layer in your Layers Palette.

Monday, March 22, 2010

Add a Background Texture Layer


Last week we learned how to copy a free image from Google Images to use with our Photoshop image.

Today we'll take that image and paste it over our Photoshop image to create a textured layer background.

Click on any image to enlarge.
  • Open an image in Photoshop that you would like to add a textured background to.
  • Find a texture that you like in Google images (or where ever else you'd like) and then copy and paste it onto your already open image in Photoshop. (Ctrl/Cmd V to paste) (See last week's tip on how to find free Google images)
  • After you've pasted your texture layer onto your picture in Photoshop select the texture layer and choose Free Transform under the Edit menu (Edit>Free Transform). You'll see the little handles around the edge of the texture image now. Just pull and stretch your texture image to fit over your Photoshop image from corner to corner. You may want to resize your Photoshop image down first if it's much larger than your texture image. (The free downloadable textures from Google are quite small but you can always buy larger higher res files from places like istockphoto.com ...or shoot your own backgrounds!) Once you get the texture layer sized to fit over your Photoshop picture be sure to check the OK box on the menu bar.
  • Next we want to change the Blend Mode to Multiply. Be sure your Texture layer is selected and double click the thumbnail texture image to bring up the Layer Style Dialog box. Change the Blend Mode to Multiply. Click OK.
  • Your image will be pretty dark with this new layer applied over it but you can lighten it by changing the Opacity slider.
  • Since we want the texture to affect just the background we'll add a layer mask to the texture layer and paint over the areas that we DON'T want the texture to show through on. Choose a soft brush and be sure your foreground is set to black. Begin painting. In my case I've painted over the horse because I want it to remain light and without a lot of the background texture on it. You can hit Control/Command J to copy this layer if you'd like to darken the background more after you've finished painting on your mask. Remember that you can "erase" anything that you've painted by changing your foreground color to white. White erases, Black paints.
  • That's it!
  • Once you get the hang of this technique it will be quite easy to add different background texture layers to many of your images. Have fun!

Monday, March 15, 2010

Free Images from Google

There are times when you want an image to use as a background for a texture in an image that you are working on and don't have the time or where-with-all to go out and shoot for it. There are many sites on the internet where you can buy and download images to use as textures or background replacements.

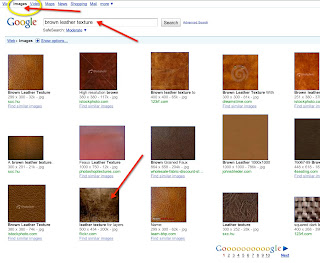
But a FREE and LEGAL way to get images quickly was just brought to my attention. Google has hundreds of different images in many different subjects that you can choose from, download instantly and they are all FREE.  Click on any image below to enlarge.

Here's how you find them:
  1. Open www.Google.com and click on the Advanced Image Search line to the right of the Search Images button.
  2. Once you are in the Advanced Image Search dialog box you'll be able to type in the kind of image you are looking for. In my example I am looking for images of "leather textures". You can search for photos, line drawings, clip art, etc. of your subject under Content Types. You can search for particular sizes of images, etc.
  3. In the Usage Rights dialog box you can choose the type of usage you are wanting the image for. If you want to use a picture for an composite that you are working on in Photoshop that you will modify (like a leather texture, or background using a beach scene) choose the "Labeled for reuse with modification" selection.
  4. I would suggest that you read the Google Usage Rights information before using an image. Just click on the "More info" tab to bring up that information.
  5. When you find the image that you like simply click on it. Next you'll get a dialog box like this:
  6. Click "see full size image" and then right click on the image. Here you can choose what you want to do with it. To bring the image into Photoshop we'll just choose "Copy Image" and then go to Photoshop and Paste it into a new document or into an already opened document.
  7. Next week we'll look at how to use these downloaded images as backgrounds in an already existing photo.

Sunday, March 7, 2010

Blur the Background


This week we are going to take a photo and blur the background. We can also create a soft overall focus with the same technique in a just few easy steps. Click on any image to enlarge.


  1. Open your image and press Command-J (PC: Ctrl-J) to duplicate the Background layer. Click on the Filter Menu and choose Blur>Gaussian Blur. Set the pixel radius setting to how much blur you would like. We are going to paint back in the areas that you want less blurred. So if you want the background really blurred out a lot then go for a higher radius. This may be something that you'd want to experiment with depending on your image and the effect you want to gain.
  2. Click OK after you have set your radius.
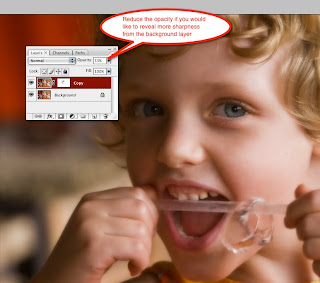
  3. Your photo will now look blurry all over. You can also drop the opacity of your blurred layer down to around 50% or 60% if you want to reveal more from the sharp background layer below. 
  4. Next, you will create a Layer Mask on your blur layer. Click on the Layer Mask icon at the bottom of the Layers Palette. Then choose a soft brush and begin painting. Make sure that your foreground color is Black to reveal the sharpness. If you'd like to go back and erase what you have done (making parts of the image more blurred again) simply change your foreground color to White and paint over. 
  5. Play around with all of these settings for different effects and different levels of blur. It can be a lot of fun!