As a fine-art photographer for the past nineteen years I've come up against my fair share of
technological challenges in photography. The shift from film to digital was monumental!
In this blog I'd like to share with you what I've found to be some of the most useful PhotoShop
techniques when working with my digital images. I hope that they will make your life a bit easier
as you work with your images. Have fun!

Welcome to my "Photoshop Tips for Photographers" Blog

Please Note: These tips have been prepared using Photoshop CS3.

Monday, January 25, 2010

Photo Shop Tip #4 - Quick and Easy Vignette

Open a new image file in Photoshop. Open your Layers Palette (Window menu>Layers) and duplicate your Background Layer. With the new duplicated layer chosen draw a rectangle around the outside edge of your image using the Rectangle Marquee tool.


With the rectangle still selected, go to the Select Menu and choose Modify>Feather. Pick a feather radius and type the number into the pixel box. Somewhere around 80-100 is a good radius to start with. Click OK.

Then go to the Select Menu again and choose Inverse. You will now see two rows of "marching ants" around your image. Go to Image>Adjustments>Curves and bring your curve down to add darkness at the desired level for the vignette shading. Click OK and Deselect.


You can always go back to the vignette layer to reduce the opacity of the vignette if you wish.

Voila'! You now have a vignette!


Monday, January 18, 2010

Week 3 - Create a Signature Brush

If you ever want to add your signature to a photo here is a quick way to create your signature brush. This allows you to add your signature with just one click of the brush tool.
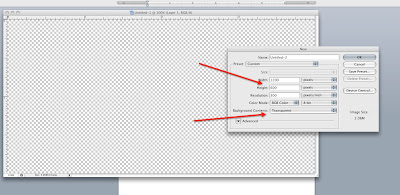
Create a new document in PhotoShop. File>New, make the new file approximately 1200 x 600 pixels, Choose Transparent for the background.

With the Text tool, type your name (or enter your text) in Black. Choose the font(s) that you like and format how you wish.

Select your text with the text tool. Then, choose your brush tool and then go to the Edit menu and choose Define Brush Preset. Name your new brush and click OK.
Now open an image that you wish to add your signature to. Then Choose the Brush Tool and open your brush palette (in the upper left hand corner of your screen). Your new brush will be added to the end of your existing brushes.
When you hover over your image with your new brush tool selected you will see your signature as your brush.
You can increase or decrease the size of your brush in two ways. Either choose the pixel size from the slider at the top of your brush palette. Or you can press the left or right bracket keys on your keyboard. (to the right of the letter P on your keyboard).

If you want to change the color of your text just click on the Foreground Color Box to bring up the Color Picker dialog box. Choose your color. Then Click OK. Now go back to your image with your signature brush and place your signature where you’d like.

Or, you can click on the Foreground Color Box With your Eyedropper Tool and choose a color from within the image that would work well for your signature.
You can always go back and change any of these settings. And you can move your brush if you don’t like how it looks after you’ve placed it. (love the UNDO command!). Just remember, you always have to have your brush tool selected for any of these steps to work! Get Creative and
Have Fun!
Monday, January 11, 2010

Week 2 - Extend an Image

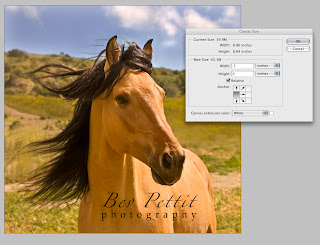
The original needs a little space added to the right:
Add space to the right by increasing Canvas Size:
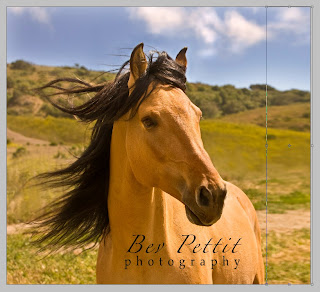
Space has been added and the selection is stretched:
Final image with space added:

Extend an Image in Photo Shop

There may be times when you’ve cropped your image a little too tight in the camera when you’re framing a photo. You may want to add more room to one side of a photo or you want your image to fit a certain aspect ratio on your page.

Here’s how you extend your image:
1. Duplicate your background layer. (Command J on a Mac. Ctrl-J on a PC.) Make sure your duplicate layer is chosen for the next step. First, you’ll be adding on to your canvas size (NOT the image size). Choose Canvas Size from the Image menu. In the Canvas Size Dialog Box click on the left-most center Anchor Point.
2. Next you’ll add your extra half inch to the Width, so type the number “.o5” into the Width box. Make sure your drop down box to the right is set to inches for this exercise (you can set to points or pixels or whatever you choose later). Since you are working on a duplicate layer your added pixels will be transparent.
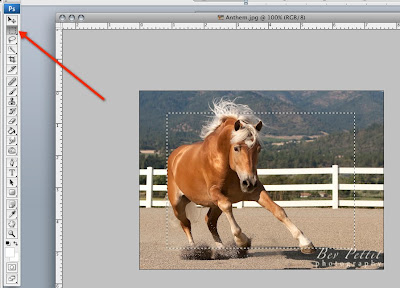
3. Using your rectangular marquee’ tool, select an area to the right of the image. Be sure to select from top to bottom. This is the area that will be stretched to fill the empty canvas. The bigger the selection the better. But do not select any part of the image that you do not want stretched (you do not want the horse stretched, in this case, so be sure to not select any part of it).
4. Copy this selection to a new layer. Command-J or Control J. 5. Select the copied layer. Now choose the Free Transform tool under the Edit Menu. Pull across, to the right, from the center right handle to stretch the layer to the edge of the new canvas.

Monday, January 4, 2010

Week 1 - Create and Add a Copyright © Symbol to your Pictures


  • Open a larger than you’ll ever need new document in PhotoShop. Make sure the background is Transparent.
  • Next choose your Text Tool. You can choose a font, color and size for your symbol either before or after you create your © symbol in your PS document.
  • To create a © symbol using a PC you hold down the Alt key and type 0169 on your keypad. (The keypad is to the far right side of your keyboard). Then release the Alt key and you’ll see your symbol - ©. On a Mac type Option-G to get your © symbol.
  • Now that you have your © symbol in a PS document you should save it.
  • You can go back to your saved symbol document anytime to change the font, color, size, opacity or change the attributes of the symbol.
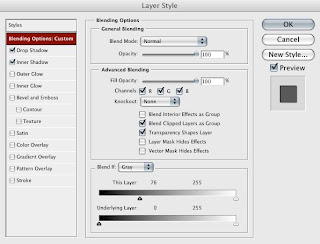
  • To change the attribute and/or opacity of the symbol you would first use the Text Tool to select your symbol. Now you can change the color, font or size. You can also change the opacity or add a drop shadow in your Layers Style dialog box. In the Layers window, double click on the text next to the layer thumbnail of your symbol to unlock it. You can open your Layers Style dialog box by double clicking the text bar to the right of your symbol thumbnail. Once you are in the Layers Style dialog box try playing with the Blending Options (drop shadow, inner shadow, etc.) and the Opacity (under General Blending). Also try adjusting the Blend If: Gray sliders at the bottom of the Layer Style dialog box to see how this changes the symbol.

  • Once you are happy with how the symbol looks you can simply drag the symbol on to the opened document in which you want the symbol placed.
  • After the symbol is placed into over your document you can change the size of the symbol if you wish. Be sure to choose the symbol thumbnail in your .psd Layers Palette. Next go to Free Transform under the Edit Menu. Hold down your shift key to constrain the proportions and drag a corner to enlarge or reduce the size of the symbol.
  • A more transparent symbol looks nice when placed directly over an image so that it doesn’t overpower the image itself, yet your copyright symbol is still obvious.